
Windows Memory Diagnostic Explained: How to Check RAM for Errors
- Kalyan Bhattacharjee

- Jun 6
- 4 min read
Updated: Jul 12
Overview | Windows Memory Diagnostic
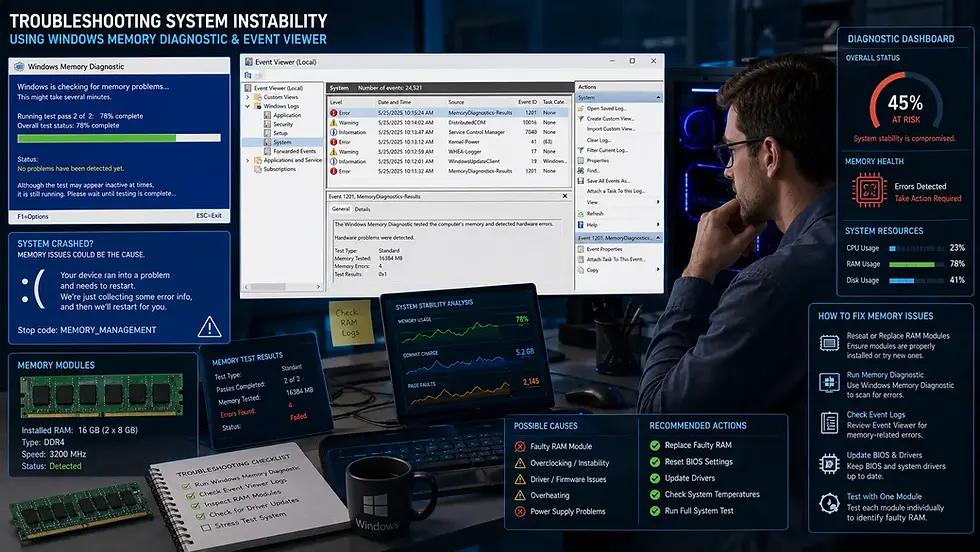
When a Windows PC starts crashing unexpectedly, showing blue screen errors, freezing randomly, or restarting without warning, many users assume the problem is related to software. However, faulty RAM (Random Access Memory) can often be the real culprit. Fortunately, Windows includes a built-in tool called Windows Memory Diagnostic that helps identify potential memory-related problems without requiring third-party software.
In this guide, we'll explain what Windows Memory Diagnostic is, how it works, and when you should use it.
What Is Windows Memory Diagnostic?
Windows Memory Diagnostic is a built-in troubleshooting utility designed to test your computer's RAM for errors.
The tool performs a series of memory tests during system startup to detect:
Faulty RAM modules
Data corruption issues
Memory stability problems
Hardware-related memory errors
If memory problems are detected, Windows can notify users after the test completes.
One advantage of Windows Memory Diagnostic is that it comes pre-installed with Windows, making it easily accessible whenever troubleshooting is needed.
Why RAM Errors Matter
RAM plays a critical role in system performance and stability. When memory becomes faulty, users may experience:
Blue Screen of Death (BSOD) errors
Random application crashes
System freezes
Unexpected restarts
File corruption
Installation failures
In some cases, memory errors can appear sporadically, making them difficult to diagnose through normal troubleshooting methods. This is why memory testing is often one of the first steps technicians perform when investigating unstable systems.
Common Signs of Faulty RAM
Before running Windows Memory Diagnostic, it helps to recognize symptoms that may indicate memory problems.
Common Warning Signs Include:
Frequent blue screen errors
Random system crashes
Programs closing unexpectedly
Startup issues
Corrupted files
System instability during heavy workloads
While these symptoms do not always indicate bad RAM, they are often associated with memory-related problems.
How to Open Windows Memory Diagnostic
Launching the tool is simple. You can use any of the following methods:
Using Start Menu
Open the Start Menu
Search for: Windows Memory Diagnostic
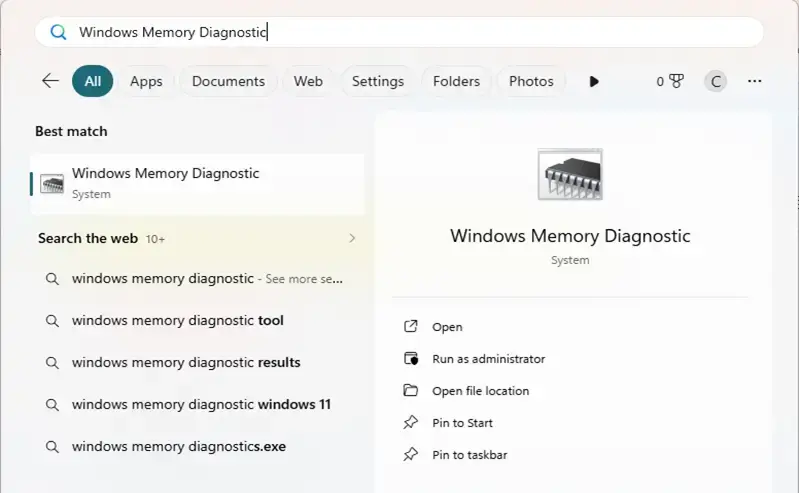
Click the utility
Using Windows Shortcut
Press: Windows + R
Type: mdsched.exe
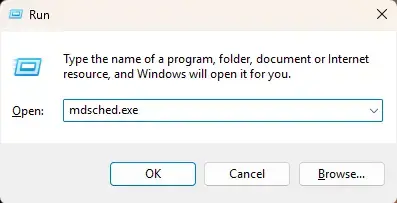
Then press Enter.
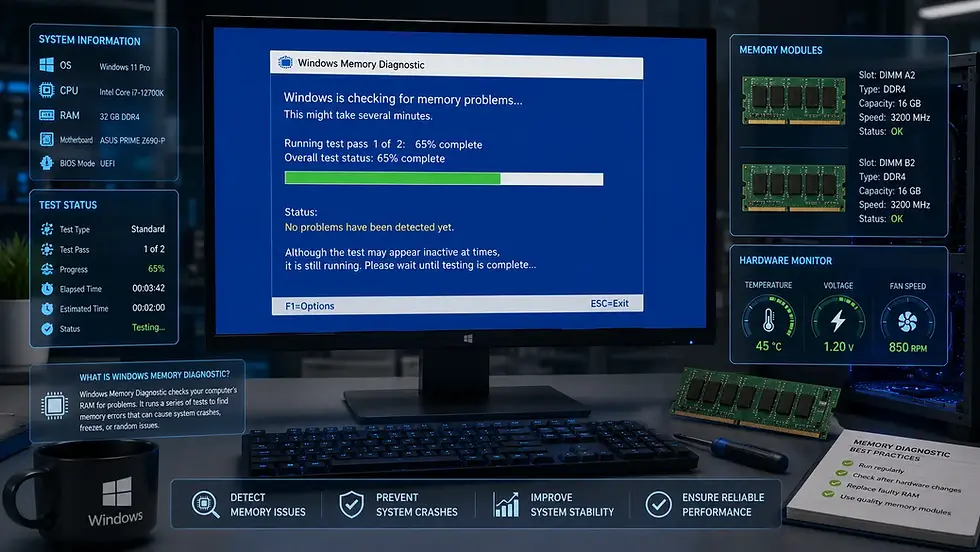
How Windows Memory Diagnostic Works
Once launched, Windows provides two options:
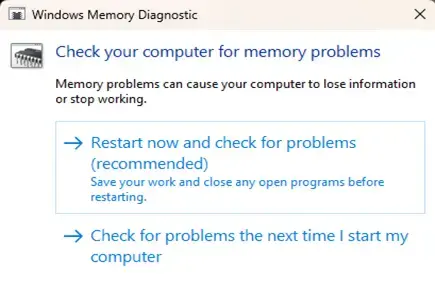
Restart now and check for problems
This immediately reboots the computer and starts the memory test.
Check for problems the next time I start my computer
This schedules the test for a future restart. After rebooting, Windows enters a dedicated testing environment before loading the operating system.
The tool then scans installed memory modules for potential errors.
Test Modes Available
Many users don't realize Windows Memory Diagnostic offers multiple testing modes.
Press: F1, during the test to access additional options. Available modes include:
Basic Mode
Performs a quick memory scan using essential tests.
Suitable for:
Quick troubleshooting
Initial diagnostics
Standard Mode
This is the default mode used by Windows.
It performs a more comprehensive set of memory checks while maintaining reasonable testing times. For most users, Standard mode is sufficient.
Extended Mode
Extended mode performs significantly more detailed testing.
It can take considerably longer but may identify issues missed by quicker scans. This option is often preferred when troubleshooting persistent or unexplained system instability.
Understanding the Results
After the scan completes, Windows automatically restarts.
Results are usually displayed through a notification after logging in. If no issues are detected, the tool may report that no memory errors were found. If problems are discovered, Windows may indicate:
Hardware memory errors
Faulty RAM modules
Potential memory instability
In some situations, further testing may still be necessary even when no errors are detected.
Memory issues can occasionally be intermittent and difficult to reproduce consistently.
Where to View Detailed Results
Sometimes users miss the notification message after Windows restarts. Detailed results can be found through:
Event Viewer
Open Event Viewer
Navigate to:
Windows Logs → System
Search for:
MemoryDiagnostics-Results
This log provides more detailed information about the completed memory test.
Limitations of Windows Memory Diagnostic
Although useful, Windows Memory Diagnostic is not perfect. Some limitations include:
Less comprehensive than specialized memory testing tools
May miss rare intermittent faults
Limited advanced reporting
Can require multiple test passes for accurate results
Because of this, advanced technicians often use dedicated memory testing utilities for deeper diagnostics. However, Windows Memory Diagnostic remains an excellent first-line troubleshooting tool.
When Should You Use Windows Memory Diagnostic?
This utility is particularly useful when:
A PC starts crashing unexpectedly
Blue screen errors appear frequently
New RAM has been installed
System instability appears after upgrades
Hardware problems are suspected
Running a memory test can help eliminate RAM as a potential source of problems before moving on to more advanced troubleshooting.
Tips Before Running the Test
To ensure the best results:
Save all open work before starting
Close running applications
Use Extended mode if troubleshooting serious issues
Run multiple passes if problems are difficult to reproduce
Verify RAM is properly seated if hardware changes were recently made
These simple precautions can improve testing reliability.
Final Thoughts
Windows Memory Diagnostic is one of the most useful yet overlooked troubleshooting tools included with Windows. It provides a quick and accessible way to check RAM for errors and can help identify memory-related issues that may be causing crashes, freezes, or system instability.
While it may not replace specialized memory testing software for advanced diagnostics, it remains an excellent starting point for both everyday users and IT professionals. If your computer begins behaving unpredictably and software troubleshooting isn't solving the issue, running Windows Memory Diagnostic is often a smart next step before replacing hardware or performing more complex repairs.
Author: Kalyan Bhattacharjee
Category: Windows | Productivity & Learning | Tech Tutorials
Expertise: Technology Analyst & Digital Research Writer
Source: Research-based content using publicly available technical resources and industry references
📚 Keep exploring - Here are more tech blogs you’ll love:
Related Keywords: check pc memory, RAM memory test, memory diagnostic tool, RAM test, RAM test software, RAM test Windows, memory diagnostic tool, check RAM for errors, windows RAM test, memory troubleshooting windows, windows troubleshooting tools, RAM diagnostics, memory test utility, windows hardware diagnostics, fintech shield


Comments